Okay, maybe not you folks in the snowbelt (I live in Florida), but if you can, getting used to biking and using the bike for transportation now will help when gas prices make their inevitable climb above $4, then $5 a gallon. Better to learn a new way of doing things before you HAVE TO.
I took this little detour away from strictly practical cycling material today because James Howard Kunstler spoke in our town (Orlando) this morning. I've been a reader of his work for quite a few years, but his most recent book, The Long Emergency, is his most important. For those of you not familiar with the concept of Peak Oil, The Long Emergency is an excellent primer. It will explain why gas is at over $3.00 per gallon, why it will continue to climb, and why "alternative fuels" will not permit us to keep driving cars the way we currently do.
A great source of up-to-date information on this matter is The Oil Drum.
Thursday, November 29, 2007
Sunday, November 25, 2007
What's That Funny-Lookin' Bike On Your Banner?
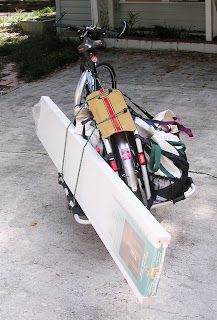
It goes by various names; a longtail or a Sport Utility Bicycle (SUB). More specifically it's a Marin Novato with an Xtracycle Freeradical conversion kit. And even more specifically, mine is named Lakshmi, after the Hindu goddess of good fortune.
The Xtracycle combination means you'll rarely have the excuse of saying, "But I can't carry..."
Here's an example of a typical load: 80" bi-fold door and other miscellaneous stuff from Lowes, plus four bags of groceries from the produce stand and the supermarket; all in one 10-mile round trip.
For more examples of what people carry on SUBs, go here.

Sunday, November 11, 2007
How Wide is a "Share-able" Lane?
Keri from Orlando wrote:
The two key questions here are "How wide must a lane be to be "share-able?" and "How far from the curb/edge should I be if it is?"
Many states have statutes allowing bicyclists to leave the right-hand side of the lane if the lane is too narrow to share with another vehicle, but none of them define just how wide such a lane would be. The Florida Department of Transportation actually did define that in their standards: 14 feet. But that doesn't officially (statutorily) define a 14-foot lane as wide enough to share. Still, I think it's a reasonable width; it's based on cyclist needs, safe passing, standard vehicle widths, and sound reasoning.

Of course you're not going to stop and pull out a tape measure to figure out if the lane is wide enough to share. Instead, just look at a car ahead of you in the lane and ask yourself if there is enough width left over from the vehicle for you to operate safely. If the answer is No, then move left into the lane.

Keri doesn't want to ride "less than 3 feet from the curb," but lane widths are measured from the lane stripe to the edge of the pavement, not to the curb, so a 14-foot lane would be 15.5 feet if measured to the curb face. On most modern streets in Florida, the gutterpan is about 18 inches wide, so if you ride about 18 inches left from the seam of the asphalt and the gutterpan you'll be about 3 feet from the curb face.

Moving inward from the curb face: 18 inches of gutterpan + 18 inches to the cyclist's wheeltrack + 18-24 inches to the left shoulder of the cyclist + 3 feet of safe passing space = 7.5 to 8 feet. That would leave 8 to 8.5 feet of space for the passing motor vehicle. Standard-size cars are about 5.5 feet; full-size SUVs and vans about 7 feet; large trucks and buses 8.5 feet.
I think 18 inches is sufficient distance to ride from the gutterpan seam, usually giving you enough maneuvering room to deal with debris and crosswinds. Potholes are another matter.
If the lane is less than 14 feet, you're justified in moving farther left. Unfortunately, most motorists don't see it that way. They usually see a 12-foot lane as wide enough to share.
Where do you ride if you are in a lane that is just wide enough for a car to squeeze past you within the lane when you ride ~3 feet from the curb? I'm struggling with this one. I don't want them to squeeze past me within the lane. I don't want to ride closer to the curb. Would this lane width be less than 14 feet?
The two key questions here are "How wide must a lane be to be "share-able?" and "How far from the curb/edge should I be if it is?"
Many states have statutes allowing bicyclists to leave the right-hand side of the lane if the lane is too narrow to share with another vehicle, but none of them define just how wide such a lane would be. The Florida Department of Transportation actually did define that in their standards: 14 feet. But that doesn't officially (statutorily) define a 14-foot lane as wide enough to share. Still, I think it's a reasonable width; it's based on cyclist needs, safe passing, standard vehicle widths, and sound reasoning.

Of course you're not going to stop and pull out a tape measure to figure out if the lane is wide enough to share. Instead, just look at a car ahead of you in the lane and ask yourself if there is enough width left over from the vehicle for you to operate safely. If the answer is No, then move left into the lane.

Keri doesn't want to ride "less than 3 feet from the curb," but lane widths are measured from the lane stripe to the edge of the pavement, not to the curb, so a 14-foot lane would be 15.5 feet if measured to the curb face. On most modern streets in Florida, the gutterpan is about 18 inches wide, so if you ride about 18 inches left from the seam of the asphalt and the gutterpan you'll be about 3 feet from the curb face.

Moving inward from the curb face: 18 inches of gutterpan + 18 inches to the cyclist's wheeltrack + 18-24 inches to the left shoulder of the cyclist + 3 feet of safe passing space = 7.5 to 8 feet. That would leave 8 to 8.5 feet of space for the passing motor vehicle. Standard-size cars are about 5.5 feet; full-size SUVs and vans about 7 feet; large trucks and buses 8.5 feet.
I think 18 inches is sufficient distance to ride from the gutterpan seam, usually giving you enough maneuvering room to deal with debris and crosswinds. Potholes are another matter.
If the lane is less than 14 feet, you're justified in moving farther left. Unfortunately, most motorists don't see it that way. They usually see a 12-foot lane as wide enough to share.
Tuesday, November 6, 2007
Basic Cycling Skills
There is a common belief out there that the people you see effortlessly and fearlessly cruising along amidst all those automobiles have exceptional skills that most people don’t have. Not true. That’s not to say they don’t have skills, and they may indeed be skills that you lack as a novice cyclist. These are not exceptional skills, but they are necessary.
Assuming you have a bike that fits and is in good mechanical order, let’s explore those skills. (I plan to have video demonstrations on these in the future.)
Mounting the Bike
With one hand on the handlebar and one on the saddle, pull the bike down towards you so that you can pick up your leg and step over the top tube. If you’re more flexible and comfortable with it you can hold the bar with both hands and swing your leg over the saddle and back wheel while your other foot is on the ground.
Power Pedal
There is a right way and wrong way to start a bicycle from a stop. You’ve probably seen folks with a foot on one pedal and the other foot paddling along on the pavement trying to get the bike rolling. It looks rather sad, doesn’t it? It’s also a bit dangerous. If you’re attempting to cross a wide street, you may not be able to get up enough speed to keep from colliding with cross-traffic.
The Power Pedal technique is simple. Pull one pedal (whichever feels more natural for you) up so that it’s about two-thirds from the top of the pedal rotation. Put your foot on that pedal and stand on it. This will naturally push you up and onto the saddle, and your other foot can easily find its pedal. Now you’re fully in control of the bike and can accelerate and shift as needed.
Shoulder Check
This is an absolutely critical skill, and some adults haven’t learned it! It doesn’t matter if you’re on a quiet residential street, a busy urban roadway, or even on a sidewalk; the ability to scan over your shoulder without making the bike swerve is a necessity. The mistake an inexperienced cyclist will make is pulling the left end of the handlebar with the left hand as he turns his head. This of course makes the bike swerve left before the cyclist has checked to be sure it’s safe to move left!
Practice this skill in an empty parking lot. You can use the parking space lines to keep track of how straight you ride. Your arms should be slightly bent at the elbows. This is a very good practice in general; it reduces stress on your hands, wrists, and shoulders, and keeps you from wobbling or oversteering. Drop your shoulders a bit and focus on just turning your neck and head. If your have mobility issues with your neck, or you want to get an especially good view of what’s going on behind you, take your left hand off the bar and place it on your thigh. Remember, it’s your left hand which inadvertently pulls on the bar; the right doesn’t push it.
Practice these variations until you can do them with minimal swerving.
About Mirrors
Many cyclists like to use a rear-view mirror, myself included, but a mirror cannot take the place of a full shoulder check scan. Turning your head is a signal to the following motorist that you are planning to do something. When changing lanes or turning left it’s very helpful to gain eye-contact with the following driver. While you may see the driver behind you; he only sees you signaling and moving across his path, perhaps making him think you’re not being cautious.
Scanning Ahead
While bicyclists are often concerned about motor vehicles approaching from behind, it’s really the ones coming from the front and sides that pose the most danger to you. A good rule of thumb is to scan for where you will be in about ten to twelve seconds. You’re looking for pavement problems, motorists coming out of driveways, pedestrians who might be about to cross, parked cars…all the sorts of things you scan for as a motorist. Scanning as a cyclist is a skill that’s based on knowing what to look for.
Braking
In another post I will cover emergency braking techniques, but such techniques are rarely needed for most situations. Still, you should understand how to use your brakes. Many novices are afraid of the front brake, believing it will “throw them over the handlebars.” Such fears are probably based on childhood mishaps or on poorly maintained bikes. A well-maintained front wheel and brake will stop you safely and effectively. This is important because your front brake has about 70 percent of your bike’s braking power.
Get in the habit of pulling the brake levers progressively; don’t yank them in all at once. As with the shoulder check, find an empty parking lot or quiet street on which to practice. Use both the front and rear brakes together. In the
Thursday, November 1, 2007
What Type of Bicycle?
Your choices for buying a quality bicycle are far better today than a decade ago, and light-years better than 20 years ago. Twenty years back you could either buy a road bike or a mountain bike. That was about it. Today there are so many variations it would be hard to list and describe them all.

I'll start with the road bike. This is what people used to call a "ten-speed," but you'll really be dating yourself and showing how out of touch you are by using that term, so stick with "road bike." The purpose of a road bike is to go fast. Period. It's light, the handlebar position puts you in a more aerodynamic position, and the tires are narrow to reduce rolling resistance. This is the bike for fast weekend rides with the local bike club. NOT the comfortable cruiser for around the neighborhood with the kids. Road bikes will come with anywhere from 18 to 30 gears, depending on the model and sub-category.

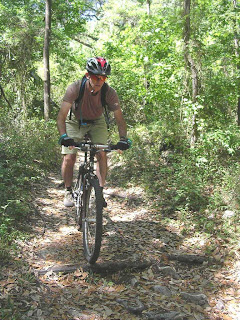
For a while the mountain bike was the bike people bought if they couldn't stand the uncomfortable position of the road bike; but then, those were the only two options. While mountain bikes are okay for around town riding (especially if you have heavily potholed or bumpy brick streets), they are really built for rugged unpaved trails through the mountains and woodlands. If you are interested in riding those rugged trails, but also want to have just one bike that will also take you around town, the mountain bike will do well. They come as either "full" suspension (front and rear; shown above), "hardtail" (front suspension only), or "rigid" (no suspension). A "hardtail" with smooth tires for the street can be a very good around town bike, especially with a rear carrier rack. Changing from smooth street tires to knobby trail tires can be a hassle; some riders have a second wheel set built for the second set of tires; changing wheels is easier than changing tires, and a second set of wheels can be cheaper than a second bike (and take up less room). Full suspension bikes are generally not so good for around-town use, because you can't mount a good rear carrier rack (unless you want spend over $100 for one made for rear suspension.)

A broad range of bikes called "comfort" or "hybrid" or "urban" bikes combine elements of road bikes and mountain bikes, and often do so with a more upright seating position. The tires will be midway between road and mountain; wide enough to handle a little dirt and absorb some road shock, narrow enough to give reduced rolling resistance. Some are now being built with 7- and 8-speed internally-geared hubs instead of the derailluer and cog system found on most bikes. These internally-geared hubs are very user-friendly, enabling you to shift while stopped, and freeing the rider from worrying about a chain that might derail from the cogs or chainrings.

"City" or "commuter" bikes are finally catching on with US bike companies. Similar to the "urban" bikes above, they go a step further and provide accessories that help make cycling a practical mode of transportation: rear carrier rack, fenders, kickstand, and sometimes a chainguard and front and rear lights.

If just want to keep it really simple, there's nothing wrong with a good ol' cruiser. Most are single-speed with coaster brakes, but some have internally-geared hubs and handbrakes. If style is your primary concern, there are tons of options available today.

Lastly (though there are still plenty more types of bikes I could be covering here -- I'll get to them all eventually!), there is the recumbent. If comfort is your primary concern and you don't have plans to ride those rugged mountain trails, this is the bike for you. You sit in a real seat, and pain to your hands, arms, neck, back, butt and (ahem) soft tissues are concerns of the past. As with so many general bicycle types, they also come in a variety of sub-categories: long-, mid- or short-wheelbase; under or above the seat steering; varying seat angles and heights; even three wheel versions.
In a future post I will cover some of these options in greater detail; especially urban and commuter bikes. Then there's always fixies, tandems, touring, cyclocross, choppers, crank-forward bikes, folders, travel bikes, long-tails, cargo bikes......better get a bigger garage!

I'll start with the road bike. This is what people used to call a "ten-speed," but you'll really be dating yourself and showing how out of touch you are by using that term, so stick with "road bike." The purpose of a road bike is to go fast. Period. It's light, the handlebar position puts you in a more aerodynamic position, and the tires are narrow to reduce rolling resistance. This is the bike for fast weekend rides with the local bike club. NOT the comfortable cruiser for around the neighborhood with the kids. Road bikes will come with anywhere from 18 to 30 gears, depending on the model and sub-category.

For a while the mountain bike was the bike people bought if they couldn't stand the uncomfortable position of the road bike; but then, those were the only two options. While mountain bikes are okay for around town riding (especially if you have heavily potholed or bumpy brick streets), they are really built for rugged unpaved trails through the mountains and woodlands. If you are interested in riding those rugged trails, but also want to have just one bike that will also take you around town, the mountain bike will do well. They come as either "full" suspension (front and rear; shown above), "hardtail" (front suspension only), or "rigid" (no suspension). A "hardtail" with smooth tires for the street can be a very good around town bike, especially with a rear carrier rack. Changing from smooth street tires to knobby trail tires can be a hassle; some riders have a second wheel set built for the second set of tires; changing wheels is easier than changing tires, and a second set of wheels can be cheaper than a second bike (and take up less room). Full suspension bikes are generally not so good for around-town use, because you can't mount a good rear carrier rack (unless you want spend over $100 for one made for rear suspension.)

A broad range of bikes called "comfort" or "hybrid" or "urban" bikes combine elements of road bikes and mountain bikes, and often do so with a more upright seating position. The tires will be midway between road and mountain; wide enough to handle a little dirt and absorb some road shock, narrow enough to give reduced rolling resistance. Some are now being built with 7- and 8-speed internally-geared hubs instead of the derailluer and cog system found on most bikes. These internally-geared hubs are very user-friendly, enabling you to shift while stopped, and freeing the rider from worrying about a chain that might derail from the cogs or chainrings.

"City" or "commuter" bikes are finally catching on with US bike companies. Similar to the "urban" bikes above, they go a step further and provide accessories that help make cycling a practical mode of transportation: rear carrier rack, fenders, kickstand, and sometimes a chainguard and front and rear lights.

If just want to keep it really simple, there's nothing wrong with a good ol' cruiser. Most are single-speed with coaster brakes, but some have internally-geared hubs and handbrakes. If style is your primary concern, there are tons of options available today.

Lastly (though there are still plenty more types of bikes I could be covering here -- I'll get to them all eventually!), there is the recumbent. If comfort is your primary concern and you don't have plans to ride those rugged mountain trails, this is the bike for you. You sit in a real seat, and pain to your hands, arms, neck, back, butt and (ahem) soft tissues are concerns of the past. As with so many general bicycle types, they also come in a variety of sub-categories: long-, mid- or short-wheelbase; under or above the seat steering; varying seat angles and heights; even three wheel versions.
In a future post I will cover some of these options in greater detail; especially urban and commuter bikes. Then there's always fixies, tandems, touring, cyclocross, choppers, crank-forward bikes, folders, travel bikes, long-tails, cargo bikes......better get a bigger garage!
Tuesday, October 30, 2007
How to Fit a Bicycle
Fitting your bicycle to your body and needs can range from a very general "close enough" for the casual around-the-neighborhood cyclist, to a detailed and exacting process utilized by racers and other high-performance riders. If you already have some miles under your belt and need help fine-tuning your fit, I recommend Jim Langley's bike fit page.
For those who might be a little intimidated about getting back on the bike, read on...
A common concern I hear from novice cyclists is, "But I want to be able to put my feet flat on the ground when I stop." With a conventional bicycle a saddle that low means your legs are not getting full extension and you're not getting full use of your leg muscles. Not knowing how to start and stop the bike properly is part of the reason novices are uncomfortable with the proper saddle height. Here is a video demonstrating proper starting and stopping.
Proper leg extension is not only a performance matter, riding with inadequate extension can lead to knee problems.
If putting your feet flat on the ground is very important to you, then I recommend you look at one of the many "crank forward" bikes available, such as the Electra. These bikes are designed so you can still have proper leg extension while also being able to put your feet flat on the ground. The down side to this is that your very upright position will catch a lot of wind, so you won't be able to go very fast.
The Basics
Make sure the bike fits by straddling the top tube and lifting the handlebars straight up. For a road bike with a top tube parallel to the ground you should be able to lift the front wheel one to two inches off the ground. If it's a mountain bike, a hybrid or comfort bike, or a road bike with a sloping top tube, you should be able to lift the front wheel two to four inches.
Your saddle should be high enough that your knee has about a 10- to 15-degree bend when your foot is at the bottom of the pedal stroke. Your feet should be positioned on the pedals so that the balls of your feet are directly above the spindles of the pedals. Having the balls behind the spindle for extended periods puts you at risk for stretched Achilles tendons. Toe clips help to keep your feet in the correct position (but they must be the right size) and also keep your feet from slipping forward off the pedals; "clipless" pedals do the same. Your saddle can also move forward and back. As Jim Langley writes: "The fore/aft seat adjustment is correct when a plumb line (any piece of string with a weight on the end) hanging from the bony protrusion just below your kneecap, bisects the pedal axle."
While Jim Langley's bike fit system is very precise, you don't have to follow all of it if you don't have plans for racing or longer rides. Notice that the fitting generally starts at the feet and legs and works its way up your body to your arms and hands. Because they are your motors, and because a bad fit can harm your knees or Achilles tendons, the fit of the feet and legs are most important. If you're not concerned with going as fast as possible (which means crouching over to get "aero"), you may wish to slack off on some of the upper body positioning; perhaps to sit a bit more upright.
Don't try to adjust your saddle position to shorten your reach to the handlebars (see Fore/Aft Seat Position on Jim's page). Get the saddle positioned correctly for your legs, then if your reach to the bars is too long or short, get a shorter or longer stem (or an adjustable one) to give you the reach you'll be comfortable with.
Monday, October 29, 2007
How to Buy a Bicycle: Part Deux: Buying Used
If you're not ready to plunk down $250 or more for a bicycle, you may be able to get something decent used, but if you're also that novice with little or not knowledge about bikes, you're going to need that experienced cyclist friend or family member. He or she can help ensure the bike is the right size and of decent quality and condition.
People selling lower- and middle-range bikes are often unclear about what they have and what size it is. It's very common to see an ad for a "26-inch men's mountain bike" for instance. 99.99% of the time that means a bike with 26-inch wheels, not a 26-inch frame. Frame size is what determines whether the bike will fit or not. (My wife is 5 feet tall and I'm 5'8"; we both ride mountain bikes with 26-inch wheels. Hers is a 13-inch frame and mine is a 16-inch. A 26-inch frame is for professional basketball players.)
The seller may be able to give you some idea of the bike's fit potential; ask how tall the rider is. Your experienced friend can help if you get a photo via the web or e-mail. That can help you screen out the bikes that definitely won't fit.
When you think you have a bike you'd like to see in person, you'll need your friend again. He or she can look it over for mechanical issues you might not catch. The frame and the wheels are the parts you'll want to inspect the closest; other parts are less critical and cheaper to replace. Look for cracks, rust (on steel frames), and ripples in the paint. Those ripples mean the frame was seriously stressed in a crash; walk away from that one. Make sure wheels are reasonably true and the bearings aren't crunchy.
Make sure the bike fits by straddling the top tube and lifting the handlebars straight up. For a road bike with a top tube parallel to the ground you should be able to lift the front wheel one to two inches off the ground. If it's a mountain bike, a hybrid or comfort bike, or a road bike with a sloping top tube, you should be able to lift the front wheel two to four inches. Have your friend set the saddle to the correct height so you can go for a ride together; he or she should be able to see any obvious fit or mechanical problems that way.
Subscribe to:
Comments (Atom)